With enthusiasm, let’s navigate through the intriguing topic related to Let’s Draw the Alphabet in Sign Language!. Let’s weave interesting information and offer fresh perspectives to the readers.
Introduction
Let’s Draw the Alphabet in Sign Language!
Hey there, budding artists! I’m your friendly neighborhood drawing teacher, here to help you unlock the magic of drawing. Today, we’re going to learn how to draw the alphabet in American Sign Language (ASL). It’s a fun and engaging way to learn a new skill while expressing yourself creatively.
Why Draw the Alphabet in Sign Language?
Drawing the alphabet in ASL is more than just a fun activity. It’s a fantastic way to:
- Develop Fine Motor Skills: Holding a pencil and making precise movements helps strengthen your hand muscles and coordination.
- Boost Creativity: Each sign has its own unique shape and movement, allowing you to explore different ways to express yourself visually.
- Learn About Deaf Culture: Drawing the alphabet in ASL helps you understand and appreciate the beauty of sign language and the rich culture it represents.
- Improve Spatial Awareness: Understanding how signs are formed in space helps you develop your spatial reasoning skills.
- Have Fun! Drawing is a fantastic way to relax, unwind, and express your individuality.
Let’s Get Started!
We’ll start by learning the basic shapes and movements for each sign.
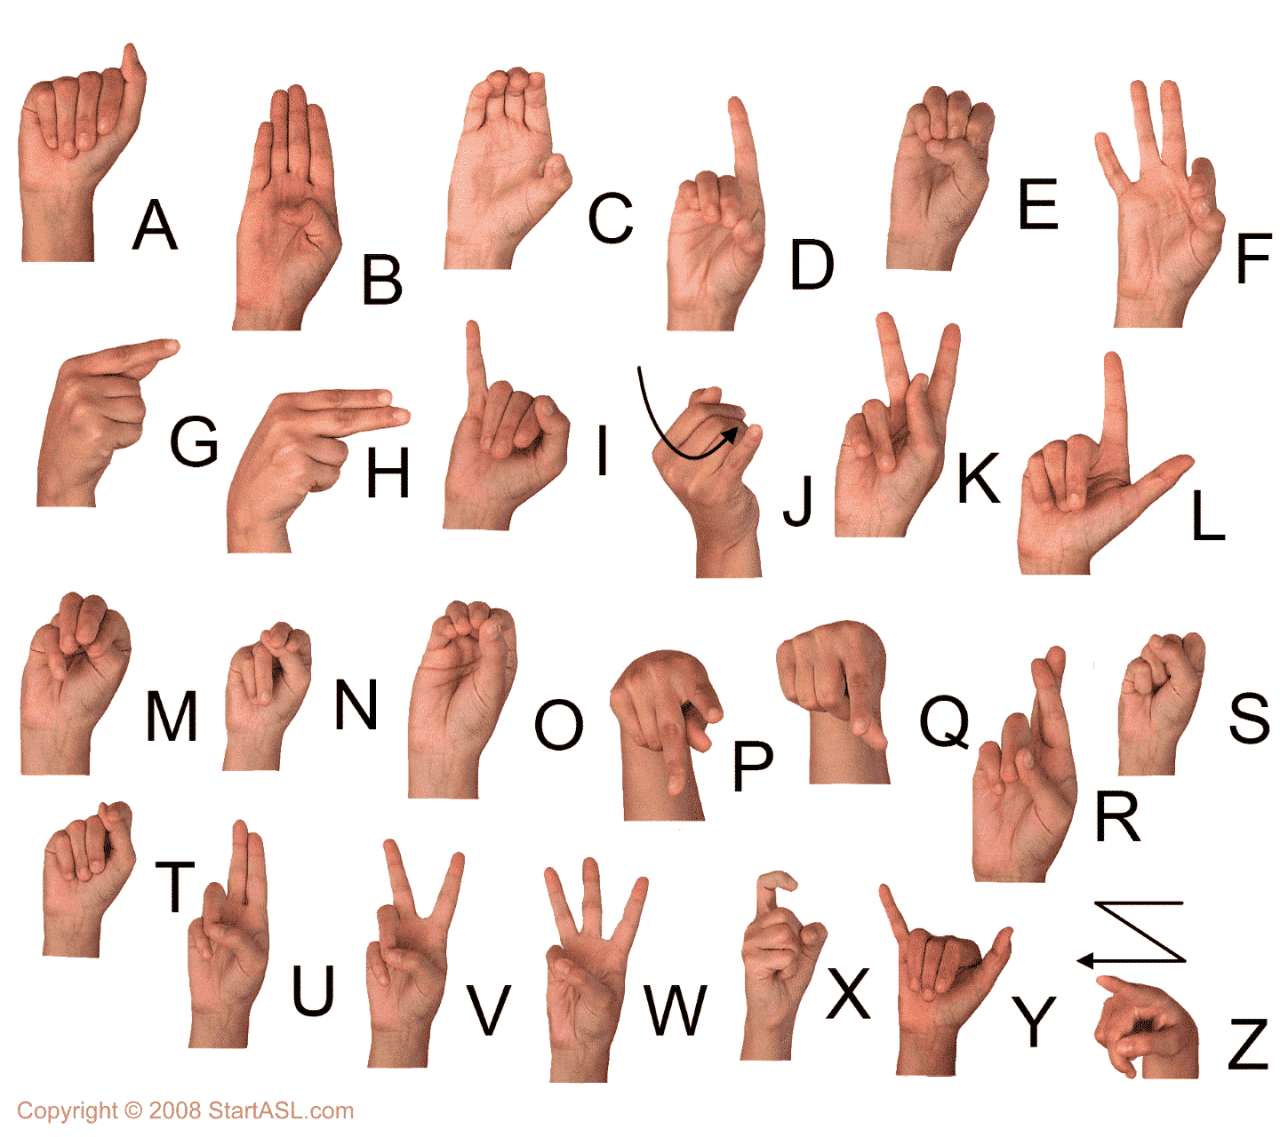
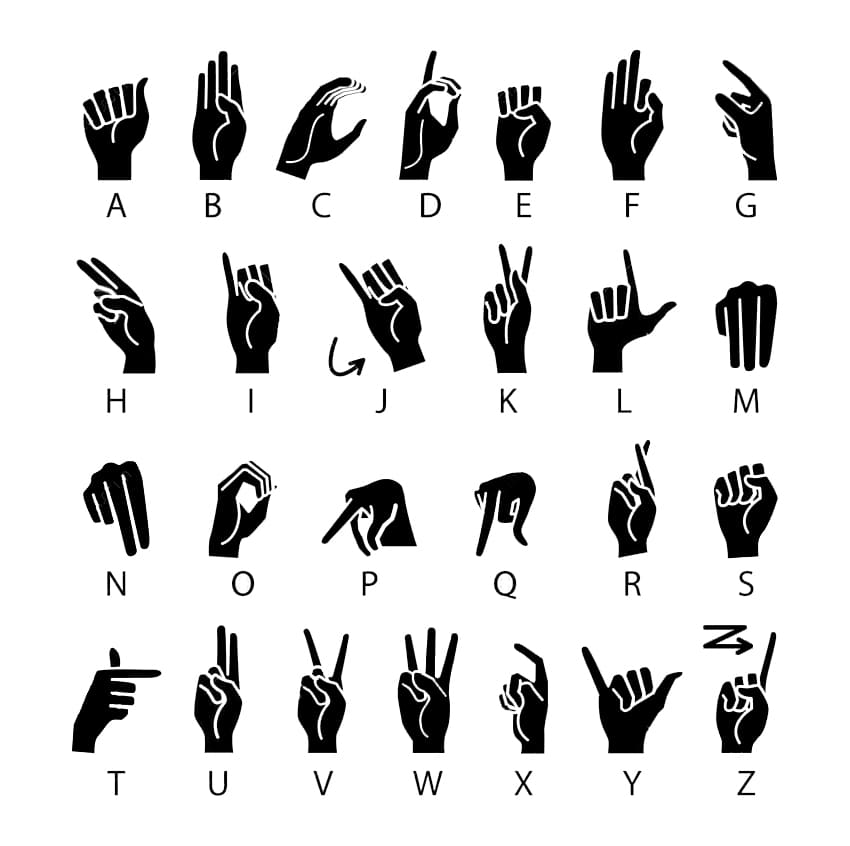
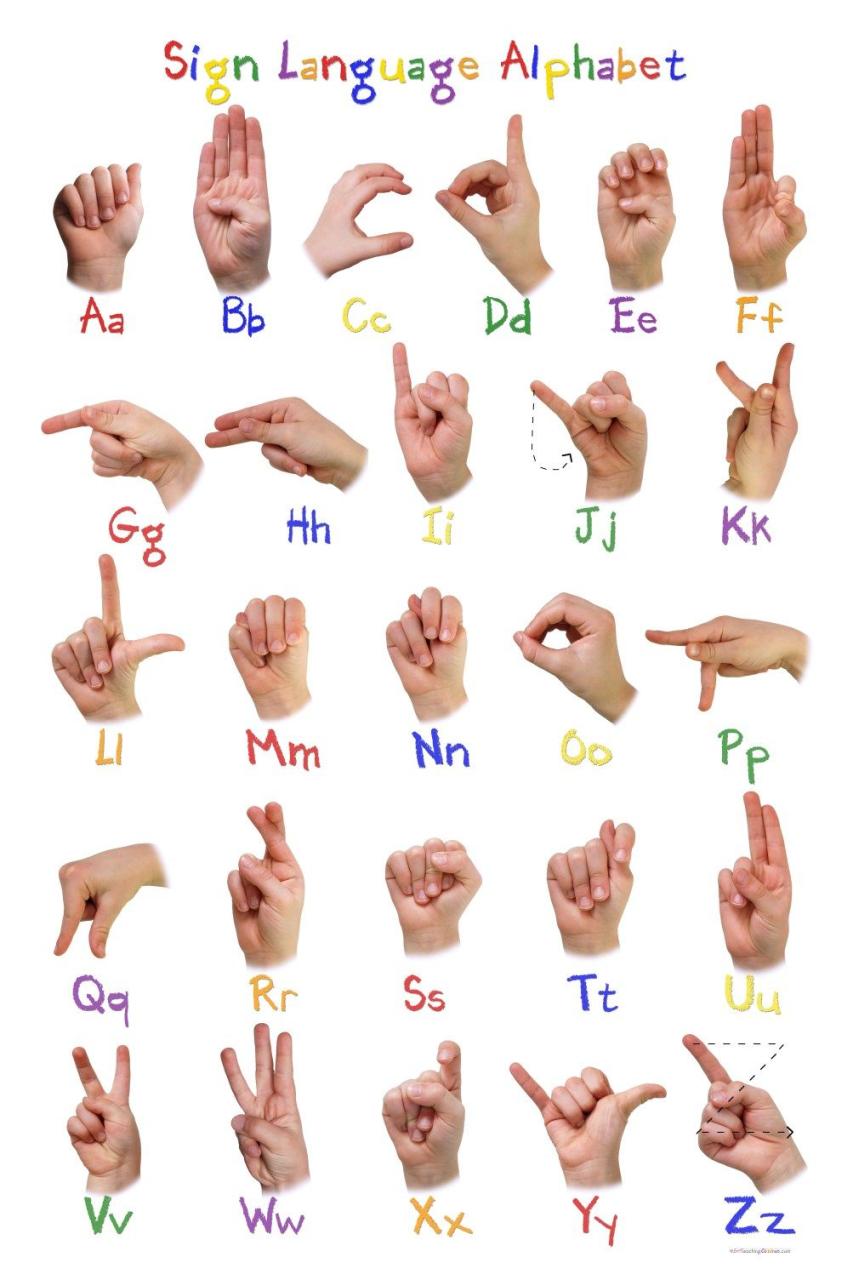
1. The Hand Shape:
- A: Start with your dominant hand in a "flat hand" position (like you’re holding a flat piece of paper).
- B: Form a "B" handshape by making a fist and extending your thumb and index finger.
- C: Make a "C" handshape by curving your index finger and thumb to form a circle.
- D: Form a "D" handshape by making a fist and extending your index finger.
- E: Use a "flat hand" position, but slightly tilt your hand forward.
- F: Make a "B" handshape, but extend your thumb and index finger straight out.
- G: Form a "C" handshape, but curve your thumb inward.
- H: Use a "flat hand" position, but hold your hand vertically.
- I: Extend your index finger straight out.
- J: Form a "J" handshape by curling your index finger and thumb to make a hook.
- K: Make a "K" handshape by holding your index and middle finger straight out and extending your thumb, ring, and pinky fingers.
- L: Extend your index finger straight out, then bend it at the knuckle.
- M: Use a "flat hand" position, but hold your hand vertically and extend your thumb and pinky finger.
- N: Use a "flat hand" position, but hold your hand vertically and extend your thumb and index finger.
- O: Form a "O" handshape by curving all your fingers and thumb to make a circle.
- P: Make a "P" handshape by forming a fist and extending your thumb and index finger, then bend your index finger at the knuckle.
- Q: Form a "Q" handshape by making a fist and extending your thumb and index finger, then bend your index finger at the knuckle and touch the tip of your thumb.
- R: Make a "R" handshape by forming a fist and extending your thumb and index finger, then bend your index finger at the knuckle and touch the tip of your thumb.
- S: Form a "S" handshape by curving your index finger and thumb to make a circle, then curve your other fingers to follow the shape.
- T: Extend your index finger straight out and touch your thumb to the side of your index finger.
- U: Form a "U" handshape by curving your index finger and thumb to make a circle, then extend your other fingers.
- V: Form a "V" handshape by extending your index and middle finger.
- W: Form a "W" handshape by extending your index, middle, and ring finger.
- X: Form an "X" handshape by crossing your index and middle finger.
- Y: Form a "Y" handshape by extending your index finger and thumb and touching the tip of your thumb to the tip of your index finger.
- Z: Form a "Z" handshape by extending your index and pinky finger and touching the tip of your pinky finger to the tip of your index finger.
2. The Movement:
- A: Move your hand from left to right.
- B: Move your hand from right to left.
- C: Move your hand in a circular motion.
- D: Move your hand from left to right.
- E: Move your hand from right to left.
- F: Move your hand from left to right.
- G: Move your hand in a circular motion.
- H: Move your hand from left to right.
- I: Move your hand from right to left.
- J: Move your hand in a circular motion.
- K: Move your hand from left to right.
- L: Move your hand from right to left.
- M: Move your hand from left to right.
- N: Move your hand from right to left.
- O: Move your hand in a circular motion.
- P: Move your hand from left to right.
- Q: Move your hand from right to left.
- R: Move your hand from left to right.
- S: Move your hand in a circular motion.
- T: Move your hand from left to right.
- U: Move your hand from right to left.
- V: Move your hand from left to right.
- W: Move your hand from right to left.
- X: Move your hand from left to right.
- Y: Move your hand from right to left.
- Z: Move your hand from left to right.
3. Putting it All Together:
- A: Start with your dominant hand in a "flat hand" position. Move your hand from left to right.
- B: Form a "B" handshape. Move your hand from right to left.
- C: Form a "C" handshape. Move your hand in a circular motion.
- D: Form a "D" handshape. Move your hand from left to right.
- E: Use a "flat hand" position, slightly tilted forward. Move your hand from right to left.
- F: Form a "B" handshape, extending your thumb and index finger straight out. Move your hand from left to right.
- G: Form a "C" handshape, curving your thumb inward. Move your hand in a circular motion.
- H: Use a "flat hand" position, holding your hand vertically. Move your hand from left to right.
- I: Extend your index finger straight out. Move your hand from right to left.
- J: Form a "J" handshape. Move your hand in a circular motion.
- K: Form a "K" handshape. Move your hand from left to right.
- L: Extend your index finger straight out, bending it at the knuckle. Move your hand from right to left.
- M: Use a "flat hand" position, holding your hand vertically and extending your thumb and pinky finger. Move your hand from left to right.
- N: Use a "flat hand" position, holding your hand vertically and extending your thumb and index finger. Move your hand from right to left.
- O: Form a "O" handshape. Move your hand in a circular motion.
- P: Form a "P" handshape. Move your hand from left to right.
- Q: Form a "Q" handshape. Move your hand from right to left.
- R: Form a "R" handshape. Move your hand from left to right.
- S: Form a "S" handshape. Move your hand in a circular motion.
- T: Extend your index finger straight out and touch your thumb to the side of your index finger. Move your hand from left to right.
- U: Form a "U" handshape. Move your hand from right to left.
- V: Form a "V" handshape. Move your hand from left to right.
- W: Form a "W" handshape. Move your hand from right to left.
- X: Form an "X" handshape. Move your hand from left to right.
- Y: Form a "Y" handshape. Move your hand from right to left.
- Z: Form a "Z" handshape. Move your hand from left to right.
Practice, Practice, Practice!
The key to becoming a skilled drawer is practice. Don’t be afraid to make mistakes; they’re part of the learning process.
FAQs:
- Q: I’m not good at drawing. Can I still learn?
- A: Absolutely! Drawing is a skill that can be learned with practice and patience. Everyone starts somewhere.
- Q: How do I know if I’m doing it right?
- A: Look at videos and pictures of ASL signs for reference. You can also ask a friend who knows ASL to help you.
- Q: What if I can’t remember all the signs?
- A: Don’t worry! You can always refer back to this guide or watch videos online.
- Q: Can I draw the alphabet in ASL in different ways?
- A: Yes! Get creative and experiment with different styles and techniques.
- Q: What can I do with my drawings?
- A: You can share your drawings with friends and family, or even create a fun alphabet book.
Remember, drawing is a journey, not a destination. Have fun exploring the world of ASL and unleashing your inner artist!

Thus, we hope this article has provided valuable insights into Downloads Let’s Draw the Alphabet in Sign Language!. We appreciate your attention to our article. See you in our next article!